User manual
Zhadi · User manual
This manual covers 1.2.3 (build 23). The app has been fully verified only on the DiLink 4.0 head unit (BYD Tang EV / Android 10); other models and head-unit versions have not been tested, and we cannot promise they will work.
Screenshots show the Chinese UI; the English build follows the same layout. Some screenshots are from development builds; the app prevails. The downloadable PDF is the Chinese print edition and may predate this page — this page is authoritative.
Install
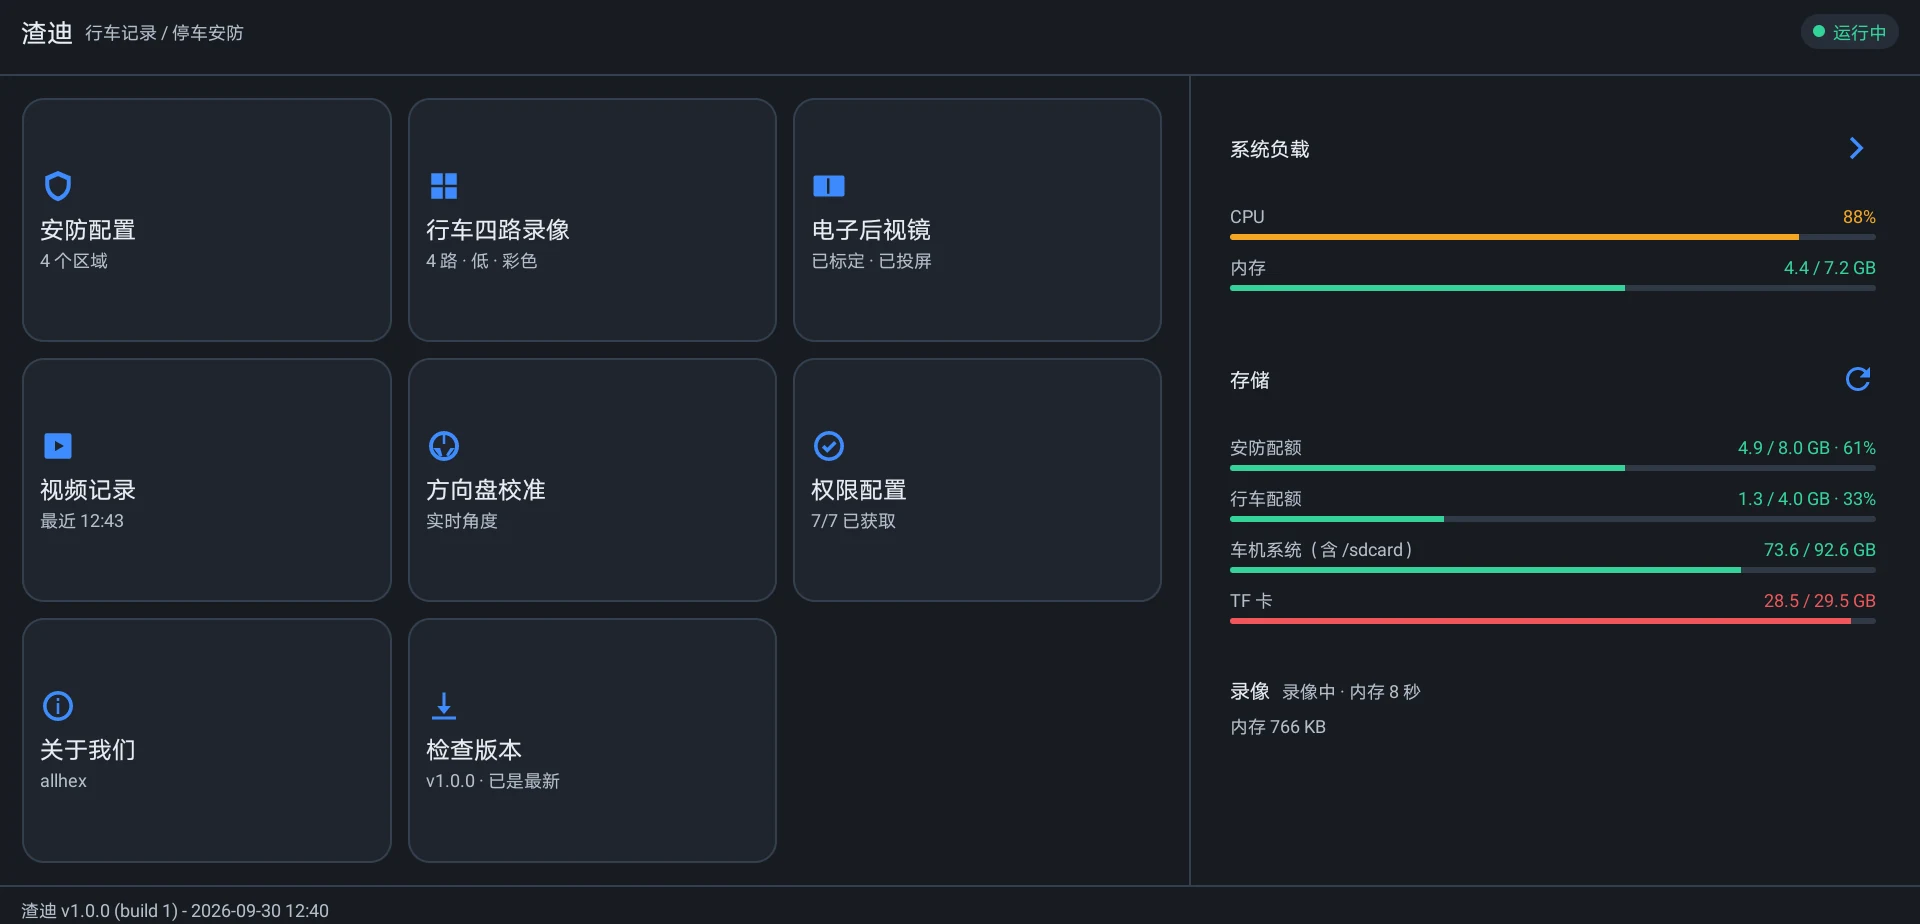
Get the packages from the Downloads page, which also lists compatibility and prerequisites. Once installed, the main features are on cards on the home screen:
1. After installing, spend two minutes on permissions
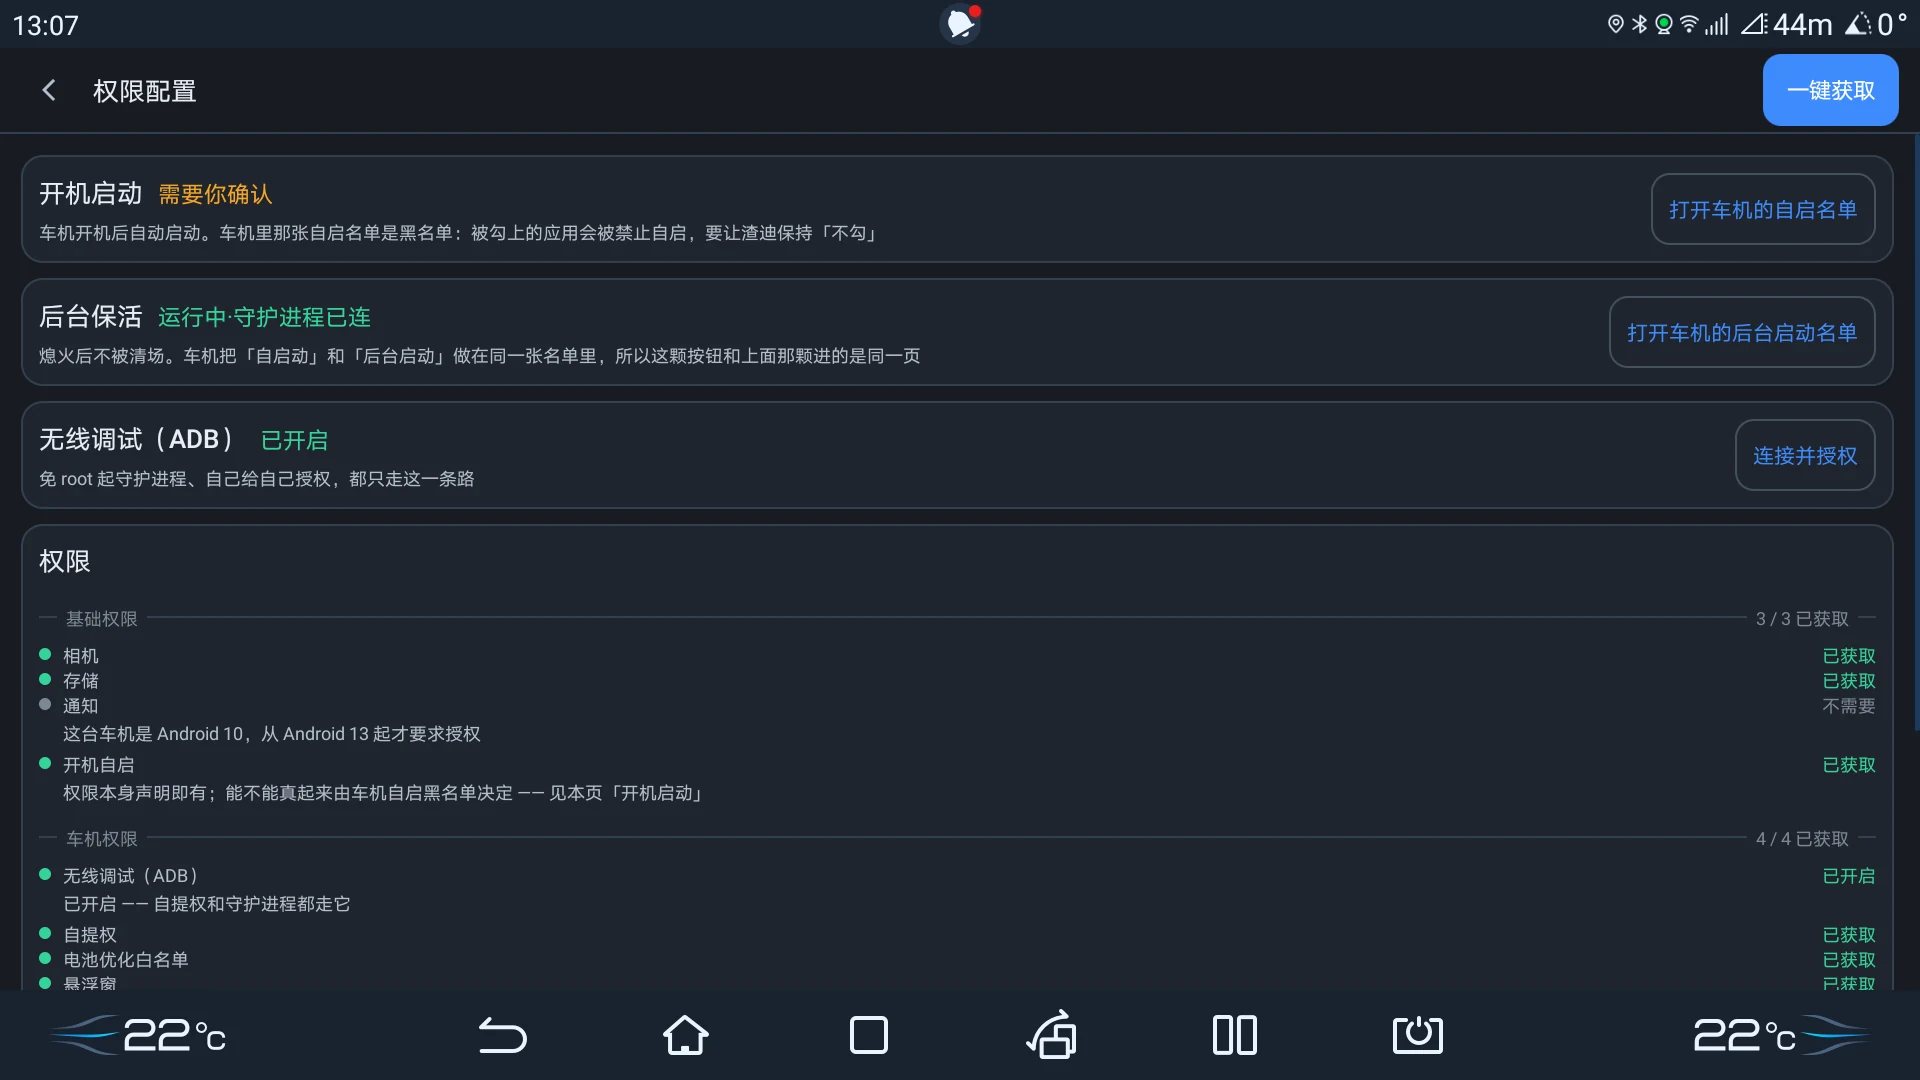
Open the app → tap Permissions. At the top right there is a Grant all button; tap it. Then check the three cards below.
① Start on boot
The app starts automatically when the head unit boots.
② Background survival
This keeps the app from being cleared after you switch off; Parking Guard depends on it. The head unit combines “auto-start” and “background start” in one list — both buttons open the same page, so you do not have to look twice.
③ Wireless debugging (ADB)
Starting the daemon without root and granting it its own permissions both rely on this one path. A green “enabled” is what you want.
Step 1 · Open settings from the head-unit home screen
On the head unit’s home screen, tap the vehicle icon at the bottom left (the bottom strip in the screenshot):

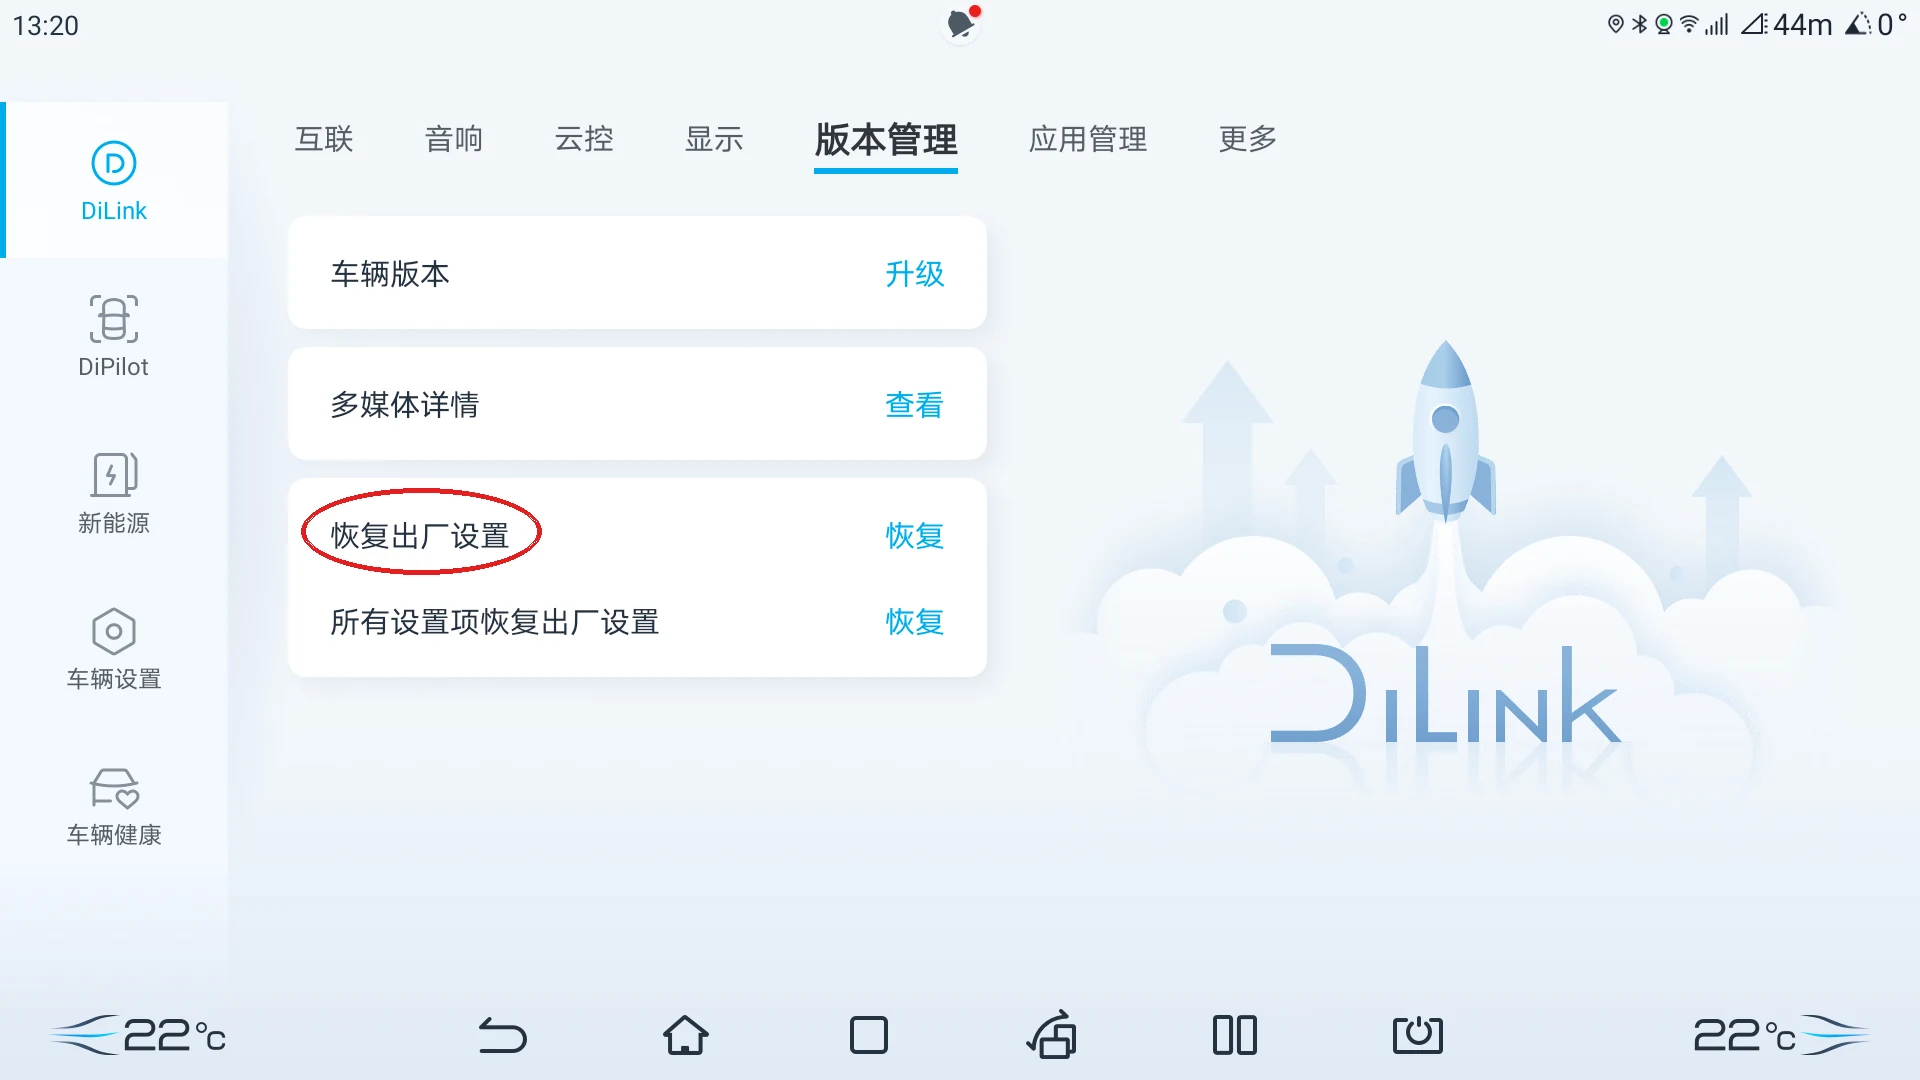
Step 2 · Go to Version management and tap these six characters
Select DiLink on the left and Version management at the top; then tap the six characters “Restore factory settings” ten times:
Step 3 · Turn on both switches
On the page that appears, turn both of these on (they turn red):
- · Enable debugging mode when USB is connected
- · Wireless ADB debugging
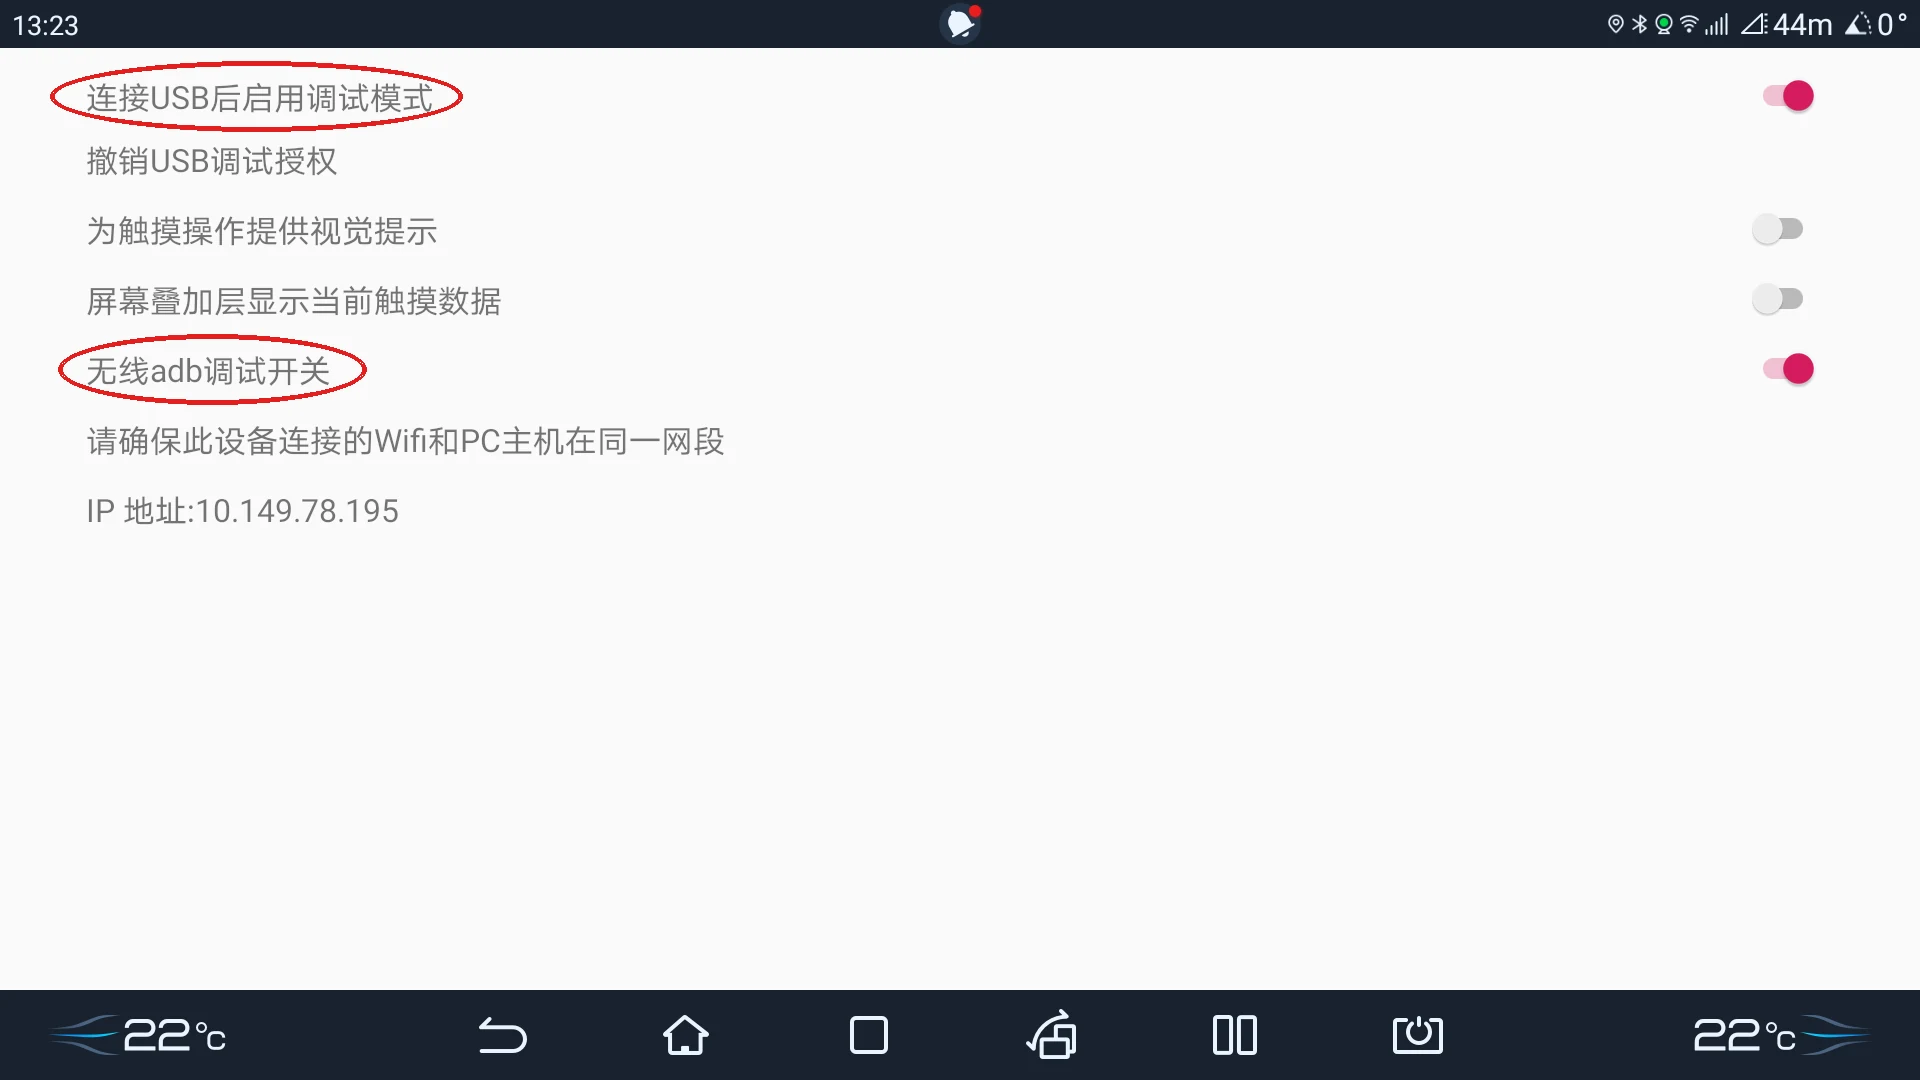
Then return to the app’s Permissions page; this item should now show a green “enabled”.
The bottom of the ADB settings page shows an IP address (10.149.78.195 in the screenshot). Every car is different; it is the head unit’s address on the local network and has nothing to do with daily use. You can ignore it.
Other permissions
Camera, storage, and network are used for recording, writing files, and update checks. When you use the phone controller, the app additionally requests Bluetooth; on Android 11 and below the system also requires location permission to scan for Bluetooth devices. Location is only used by the system for scanning — it is never read, stored, or uploaded.
The full permission list and the reason for each item are on the app’s Permissions page and in the Privacy Policy.
2. Four-channel drive recording
Recording starts automatically when you drive, with front, rear, left, and right recording at once, in full-resolution color. Version 1.2.x removed the low-resolution and single-channel options — you no longer trade clarity for space.
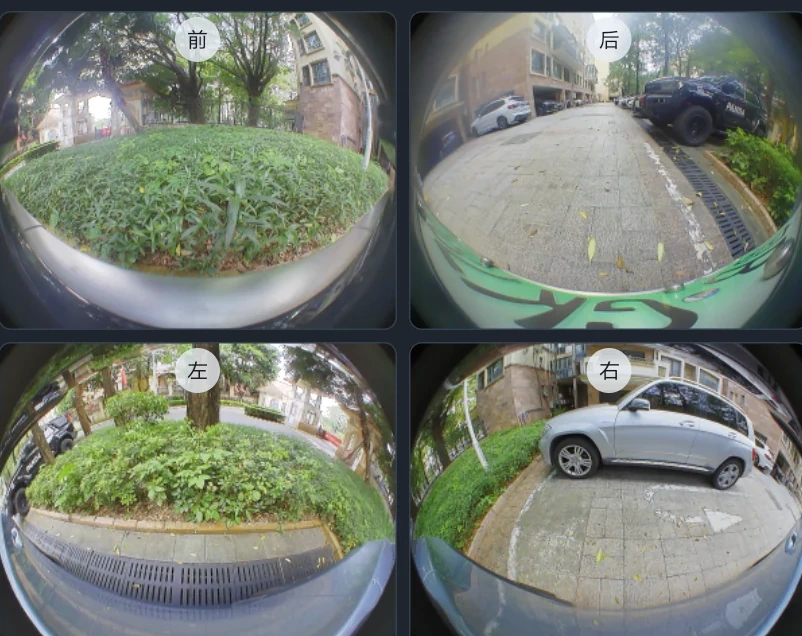
What you can change
| Item | Description |
|---|---|
| Recording | Starts automatically while driving |
| Loop recording | Overwrites the oldest clip when full |
| Frame rate | 15 / 25 fps |
| Resolution | Full-resolution color (fixed) |
| Clip length | 1 minute |
| Drive quota · Internal | 1 / 2 / 4 / 8 GB |
| Drive quota · TF card | 0 / 1 / 2 / 4 / 8 / 16 GB (0 = do not use the card) |
| Drive quota · USB | No quota; when less than 1 GB remains, the oldest USB clips are deleted first |
Where recordings are stored
Recordings can go to the head unit’s internal storage, or to a TF card or USB drive you plug in. USB drives carry no quota; when space runs low, the oldest USB clips are deleted first, and only then does it fall back to internal storage.
Top status light
| Colour | Meaning |
|---|---|
| Blue | Recording to the TF card |
| Purple | Recording to internal storage |
| Amber | Daemon online, but not recording |
| Red | Not connected |
The bottom of the screen also shows recording status and space used (for example, “Recording · 1.4 GB used”). The right column is the live preview — quad view only (front / rear / left / right). Check all four angles before you drive.
3. Parking Guard
Switch off, lock up, and walk away — the car is still watching. When something changes inside a detection zone, that clip is kept separately.
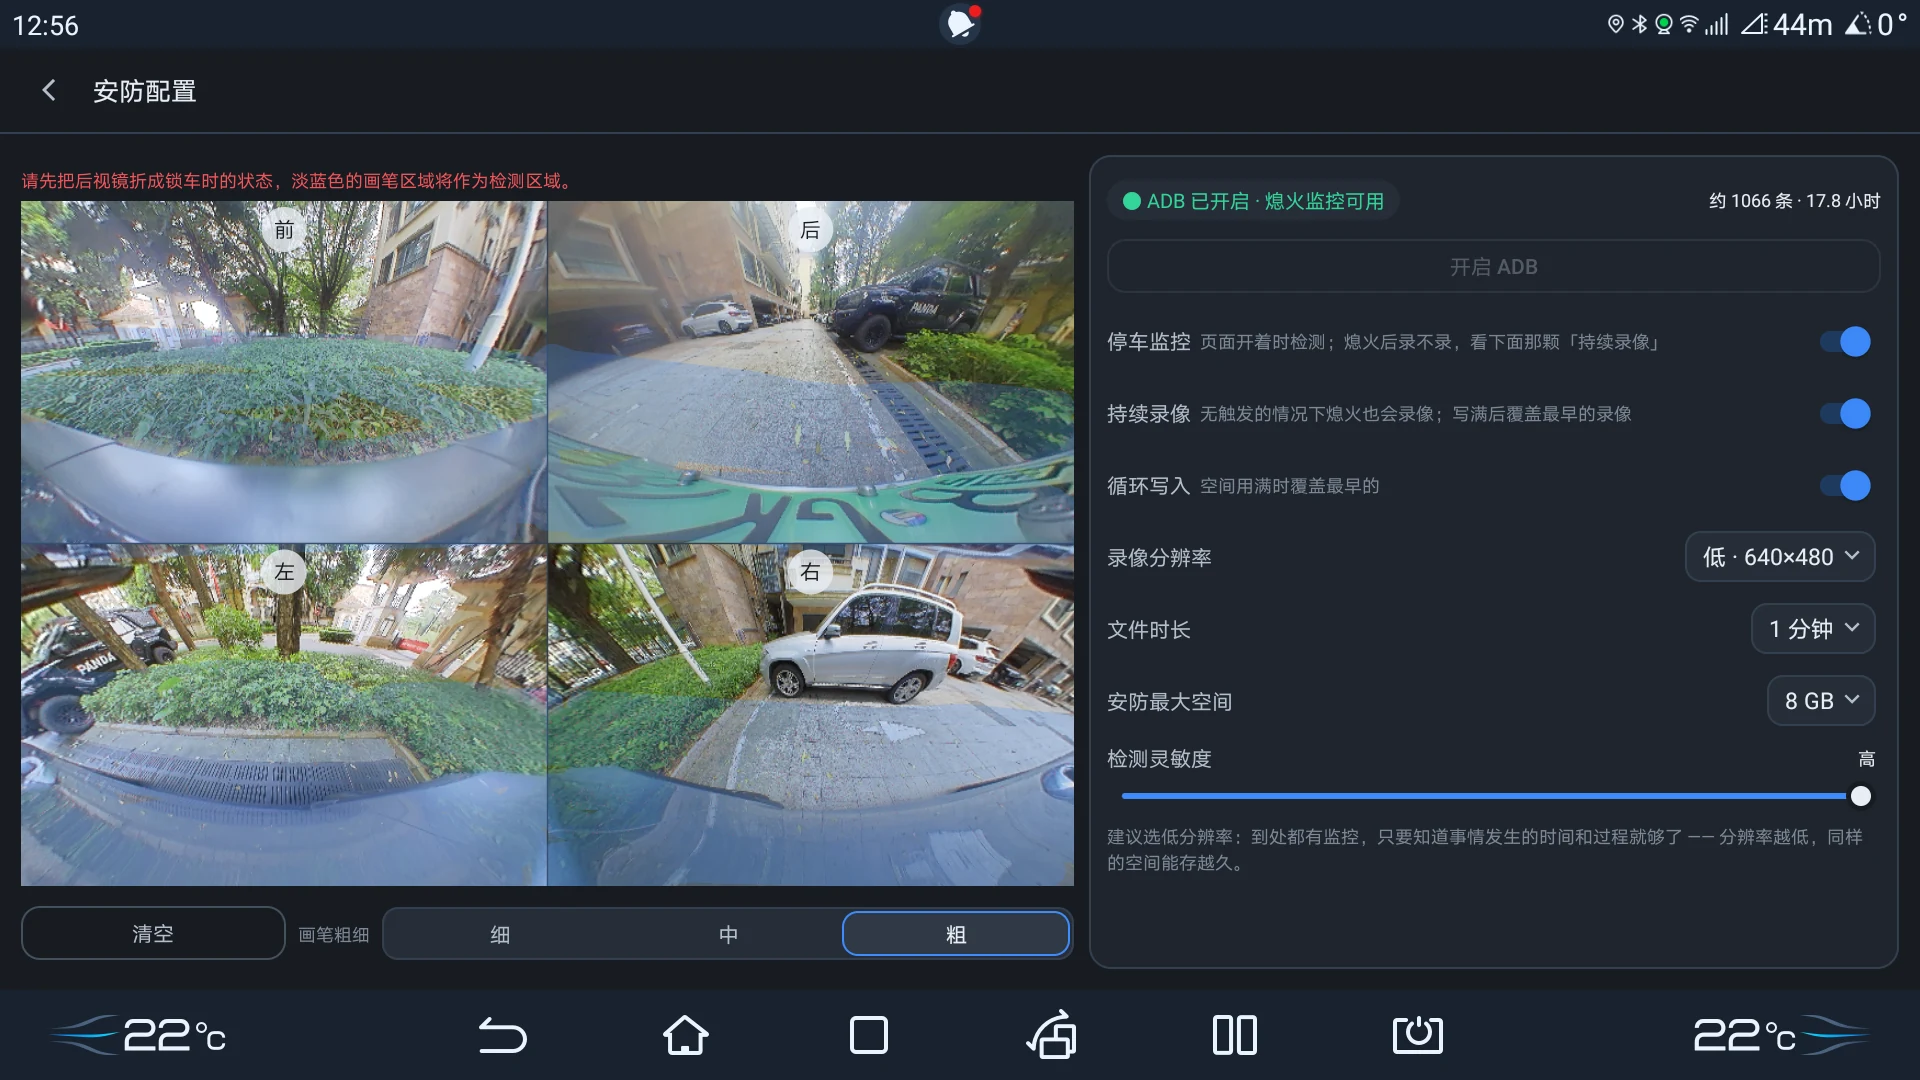
Step 1: Paint detection zones
The left side shows live views from the four cameras. Use your finger to paint zones on the image — painted areas turn light blue. Only movement inside a light-blue zone is recorded as an event.
- · The toolbar has three buttons: Clear / Paint zone / Erase
- · The brush has one size; use Erase for a mistake, or Clear to start over
Step 2: The switches on the right
| Switch | What it means |
|---|---|
| Parking Guard | Master switch: record after the car is off or not |
| Continuous recording | Records even without a trigger; overwrites the oldest when full |
| Loop recording | Overwrites the oldest clip when full |
| Frame rate | 15 / 25 fps |
| Parking quota · Internal | 2 / 4 / 8 / 16 GB |
| Parking quota · TF card | 0 / 2 / 4 / 8 / 16 GB (0 = do not use the card) |
| Detection sensitivity | Low / Medium / High |
| Event AI Check | Off by default; reviews five seconds either side of the trigger on that channel |
· On — records continuously after you switch off; most complete, but uses the most space and power
· Off — records only when movement is detected in a zone; much lighter
The readout at the top right shows how many parking clips have accumulated (for example, “~283 clips · 4.7 hours”) — evidence that it has been working.
Parking clips can also be written to a TF card or USB drive. When space fills up while parked, the oldest recordings are overwritten according to the policy you chose.
How “Event AI Check” works
Event AI Check is off by default. Turning it on downloads a model of about 4.7 MB once. After that it stays idle until a zone triggers, then reviews five seconds either side on that channel; the verdict appears at the lower left, and Recent triggers keeps the last three 5-second clips while the page is open (they are cleared when you leave). AI can miss or misclassify things; it is an extra layer of context, not a replacement for security.
“Recent triggers”
The bottom of the Parking Guard page keeps the last three 5-second trigger clips, so you can see on the spot what AI decided and which channel triggered it. The list is kept only while the page is open and is cleared when you leave; for the long-term record, look in “Video Records” for clips marked “Triggered”.
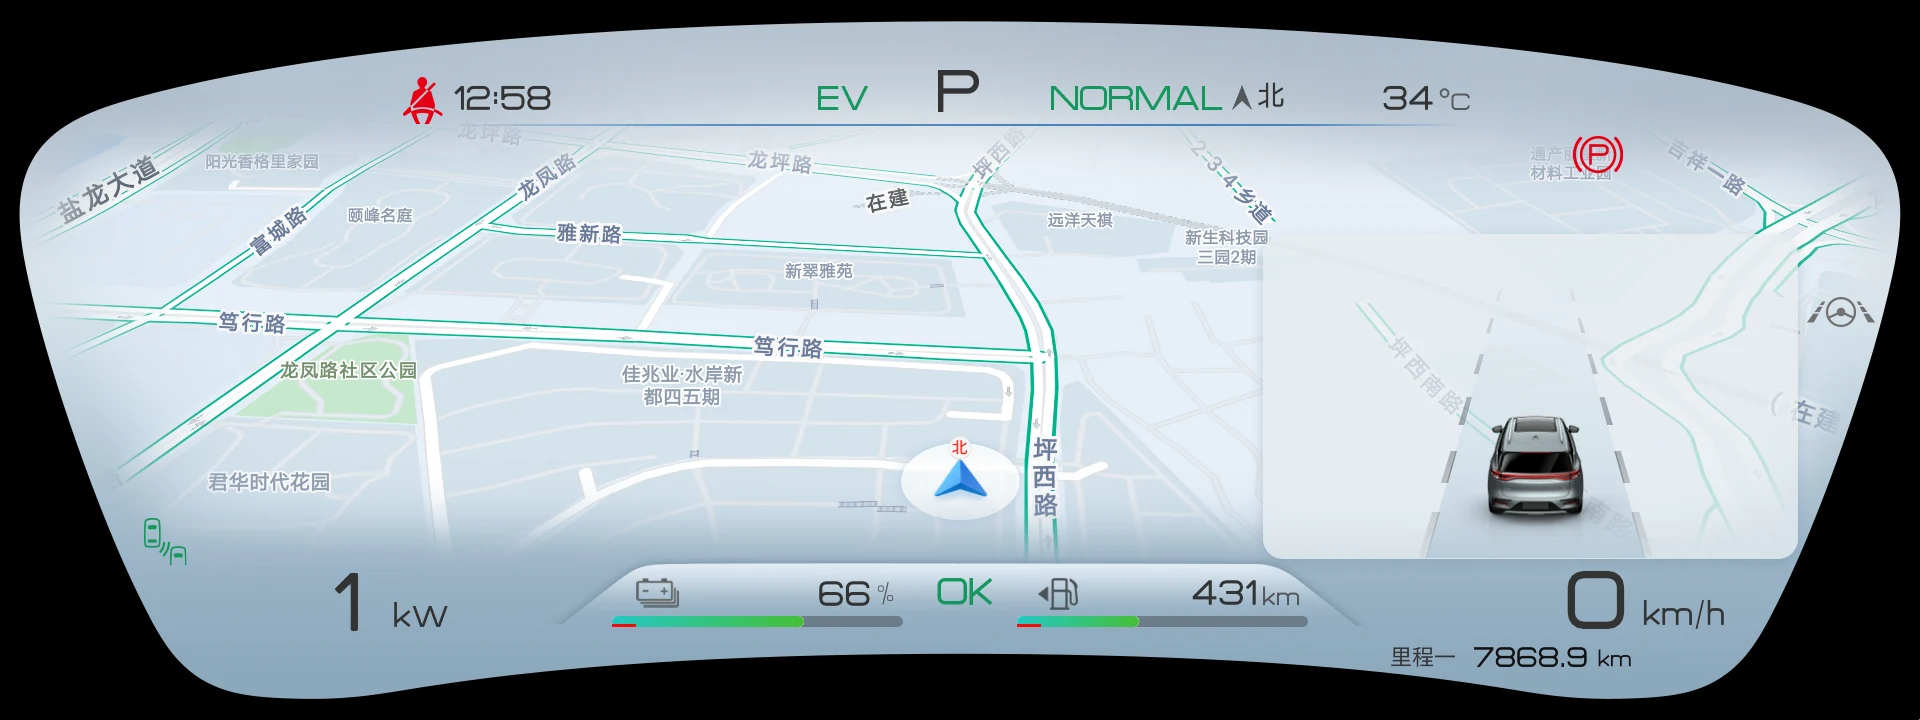
4. Digital side mirrors (putting the mirrors on the cluster)
When you signal or shift into Reverse, the left and right mirror views are sent to the instrument cluster. Your eyes stay ahead, and you still know what is beside you.
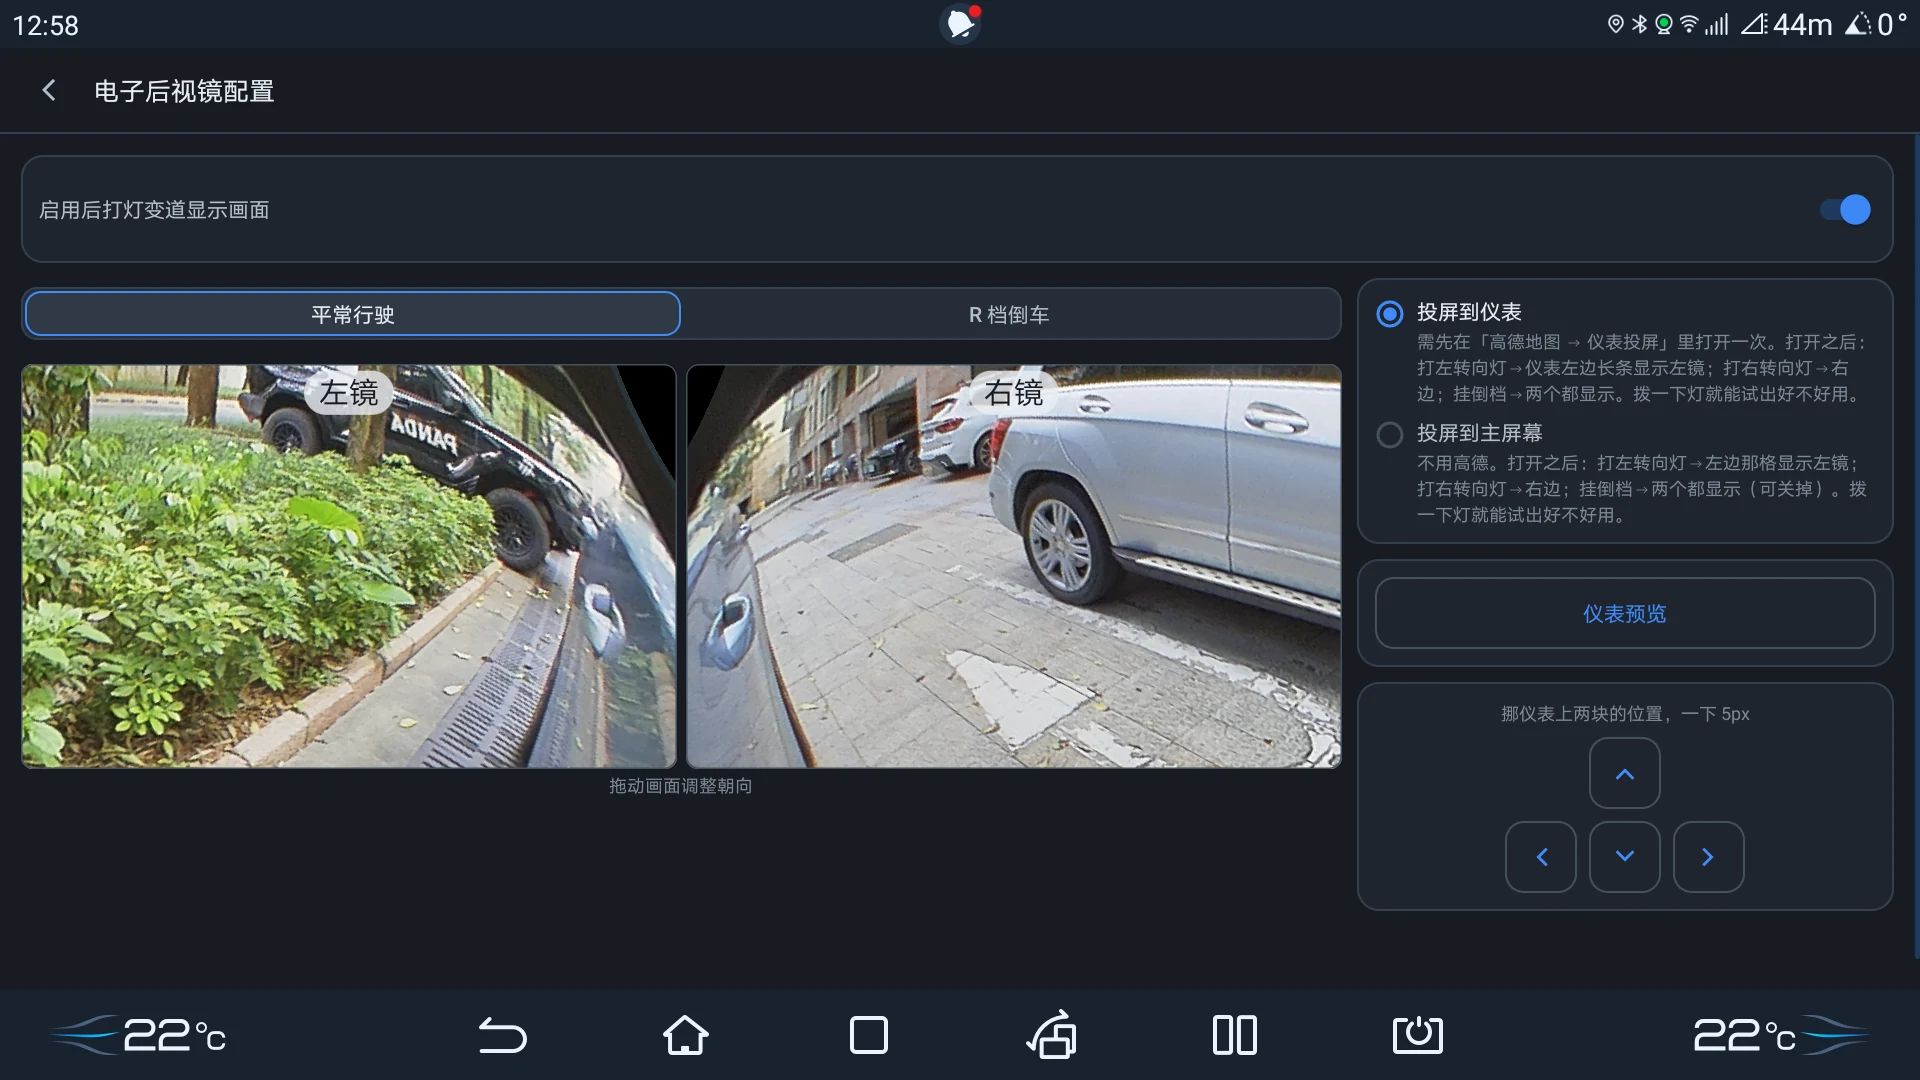
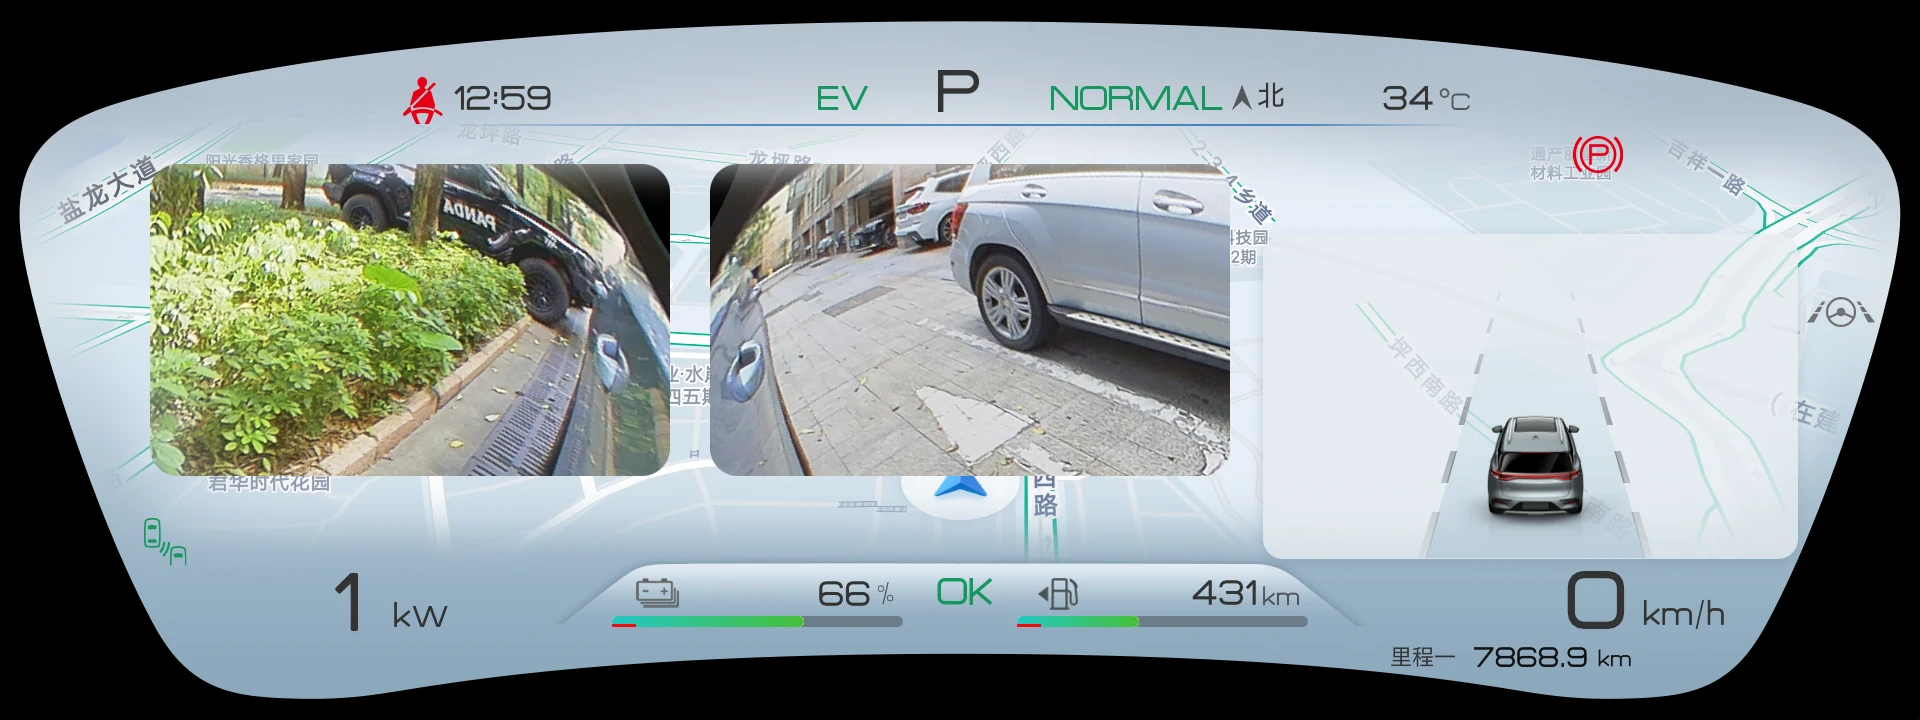
The top switch
- · Normal driving: “Show the view when you signal to change lanes”
- · Reverse: “Show both side mirrors in Reverse”
The two scenes have independent switches and independent view directions; changing one does not affect the other.
Two scenes, two purposes
| Scene | View direction | Used to |
|---|---|---|
| Normal driving | Rear three-quarter view | know whether a car is beside you |
| Reverse | Down and rearward along the side | see the ground and where your wheels are |
Drag the image with your finger to adjust the direction. Everyone sits differently; aim the mirror where you need it.
Where to cast (choose one)
| Option | Description |
|---|---|
| Cast to the cluster | First open Cast to Cluster once in Amap. After that: signal left → the left strip shows the left mirror; signal right → the right strip; Reverse → both. |
| Cast to the center screen | No Amap needed. The same signal triggers show the mirrors on the center screen. |
Two small tools
- · “Cluster preview” — See the result for a few seconds before it disappears. Use it while positioning.
- · “Nudge” — Move the view one step at a time, 5 px per press. If it covers something important on the cluster, nudge it aside.
5. Playback
Open “Video Records”.
- · On the left: dates, only days with recordings
- · At the top: four categories — All / Drive / Parking / Locked
- · Each row: a four-channel thumbnail plus start time, duration, type, and size
- · Top filters: filter by type and by storage — internal / TF card / USB drive
- · Clips with a trigger carry a “Triggered” marker
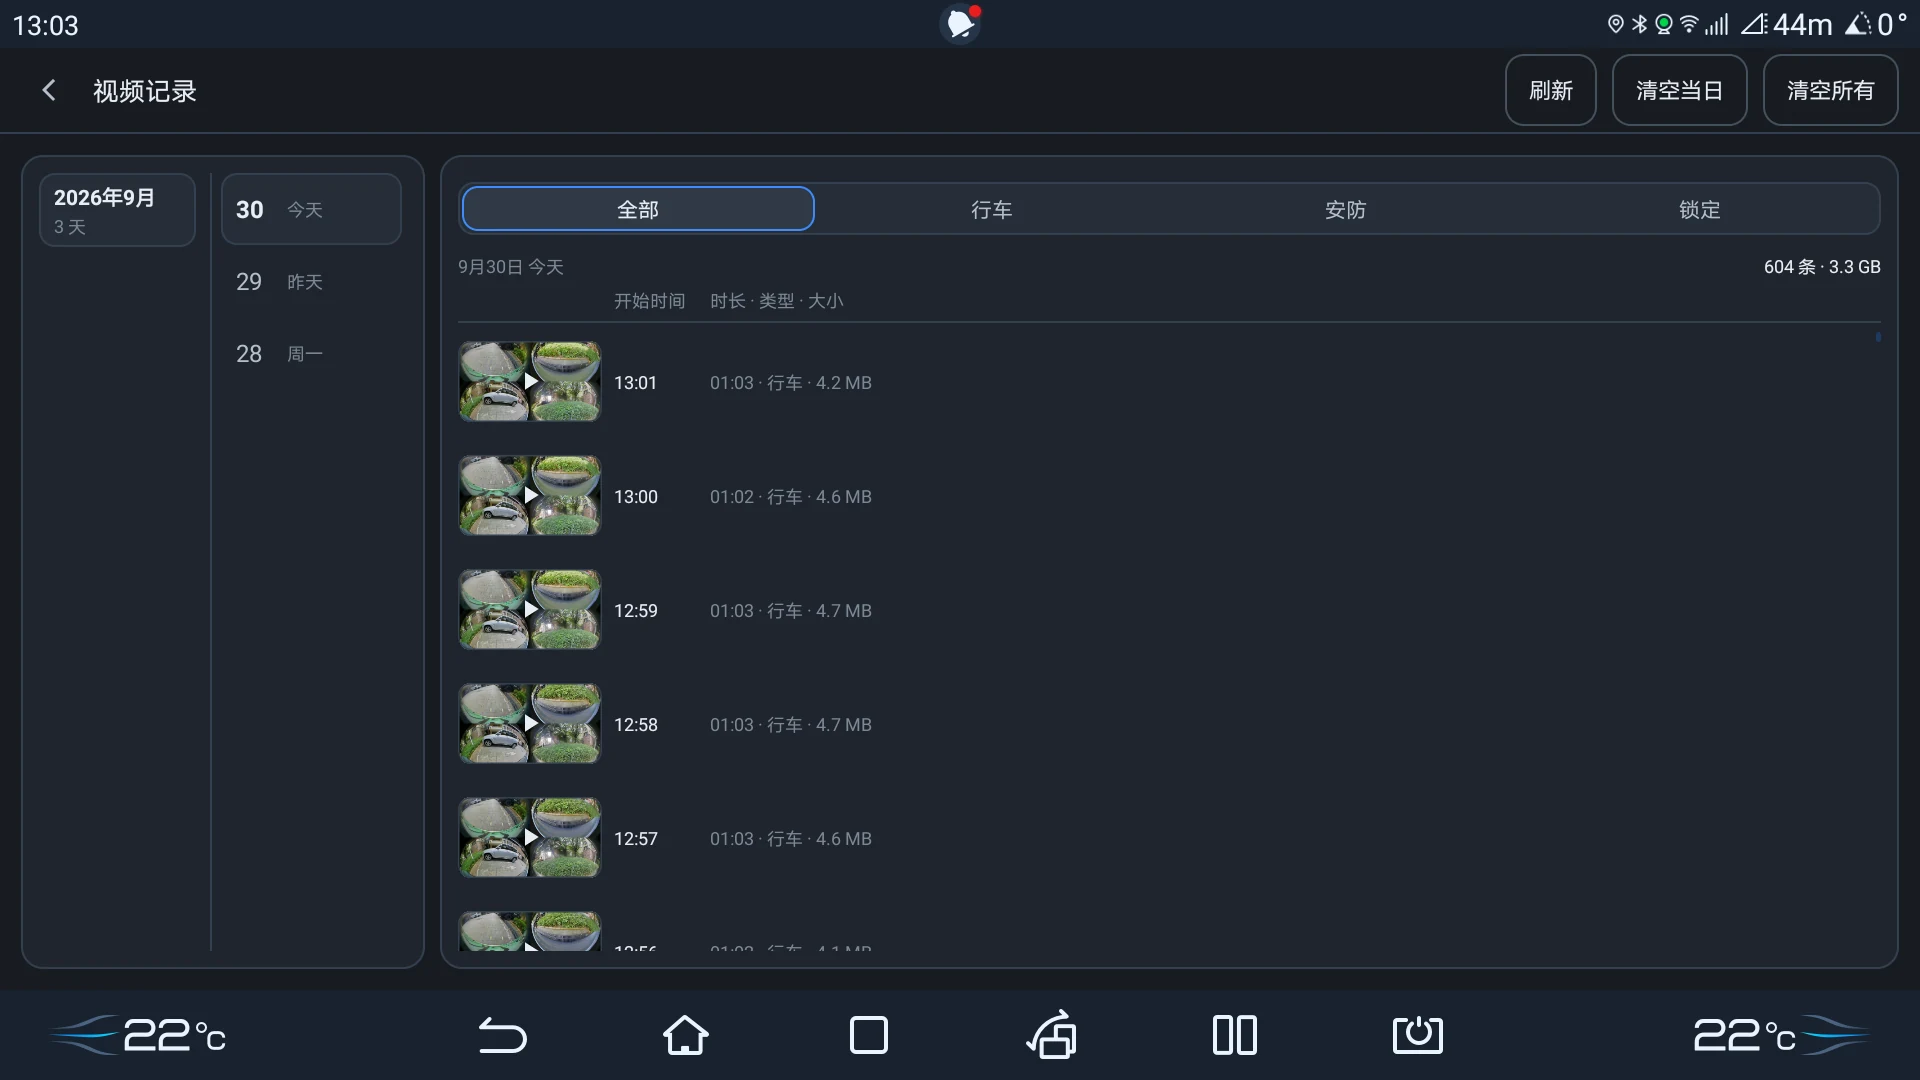
Filter by type and by storage at the top: internal / TF card / USB drive.
Open a clip: the raw recording
Playback has only one view now: the recorded frame shown exactly as it was captured — no longer split into four channels, dewarped, or stitched. Drag the progress bar to seek; the timestamp and vehicle status are already burned into the image.
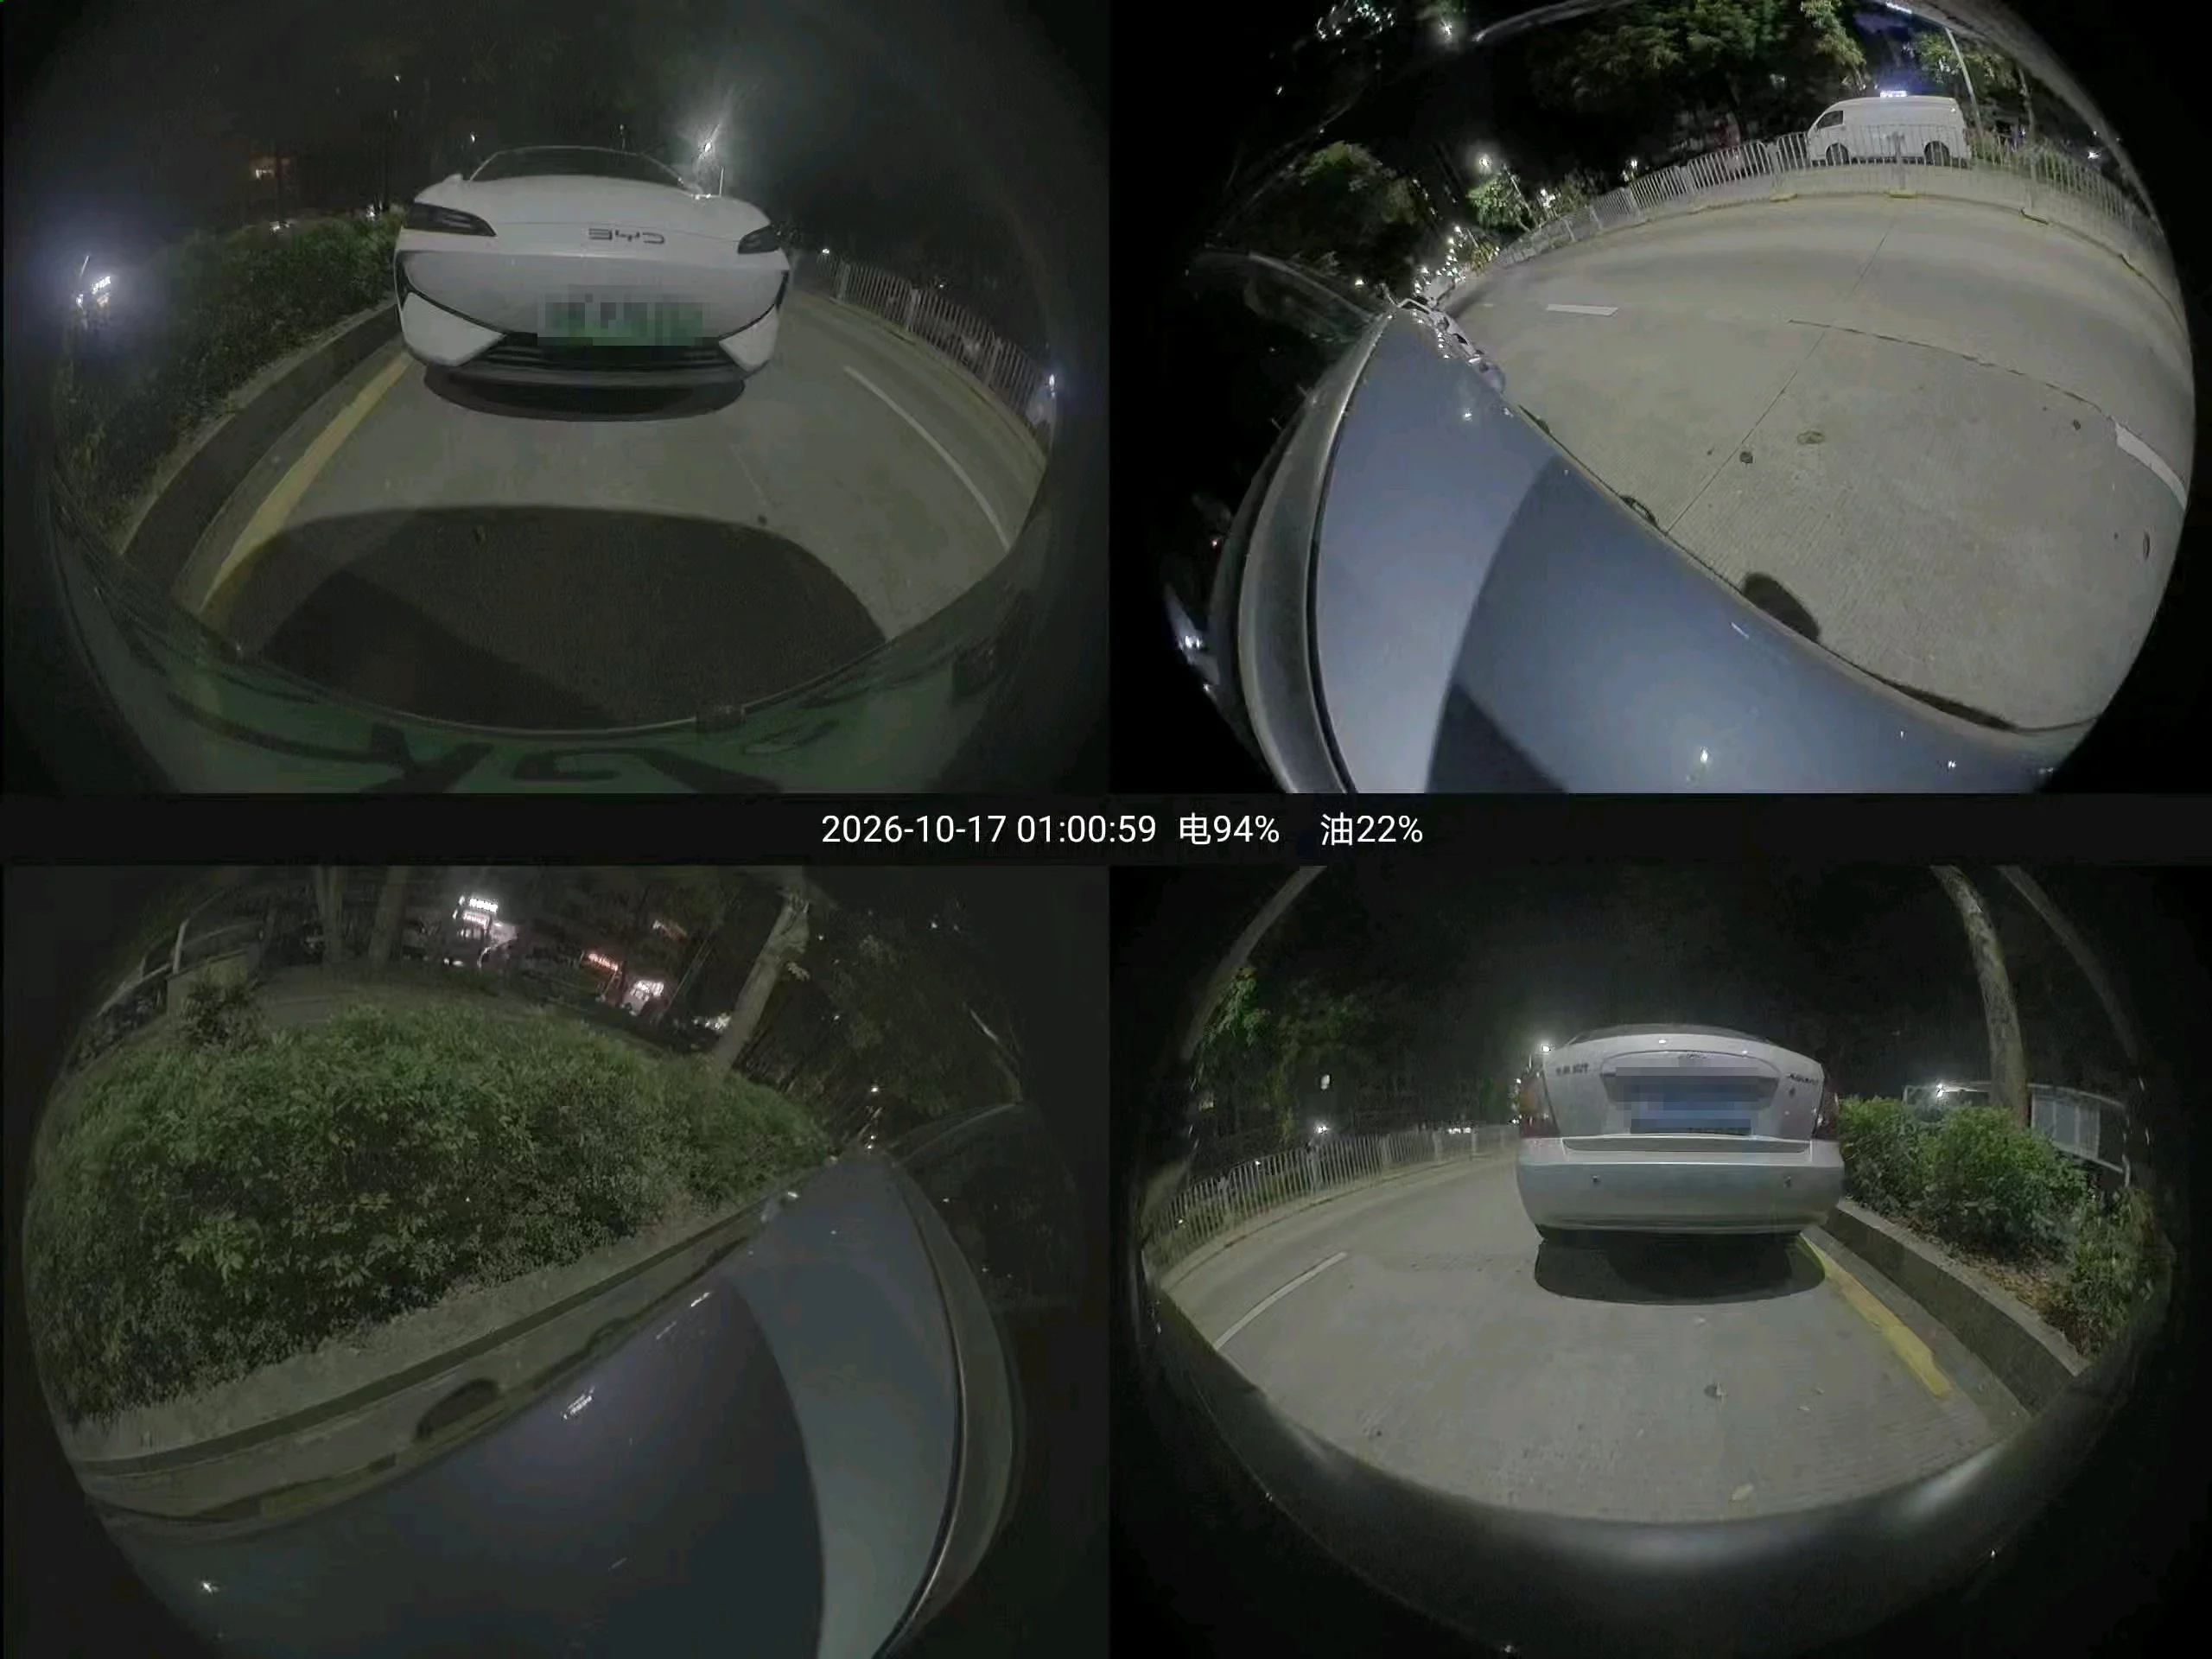
Clips with a trigger are marked “Triggered”, so you do not have to scan from the beginning.
Loop recording overwrites the oldest clips. Locked clips are the exception — they are not overwritten. The worst outcome is looking for a clip and finding it already gone, so lock the ones that matter.
6. Steering angle check (a small self-test)
This page is for your own check — does the car track straight? The method is written on the page itself:
- 1. Find a flat, quiet, straight road
- 2. Hold the wheel until the reading is 0° (a green box appears)
- 3. Hold it there and see whether the car tracks straight
- 4. If the car clearly pulls to one side, have the steering angle calibrated or the wheels aligned
- 5. ⭐ Test the other way as well: drive straight and check whether the reading is 0°
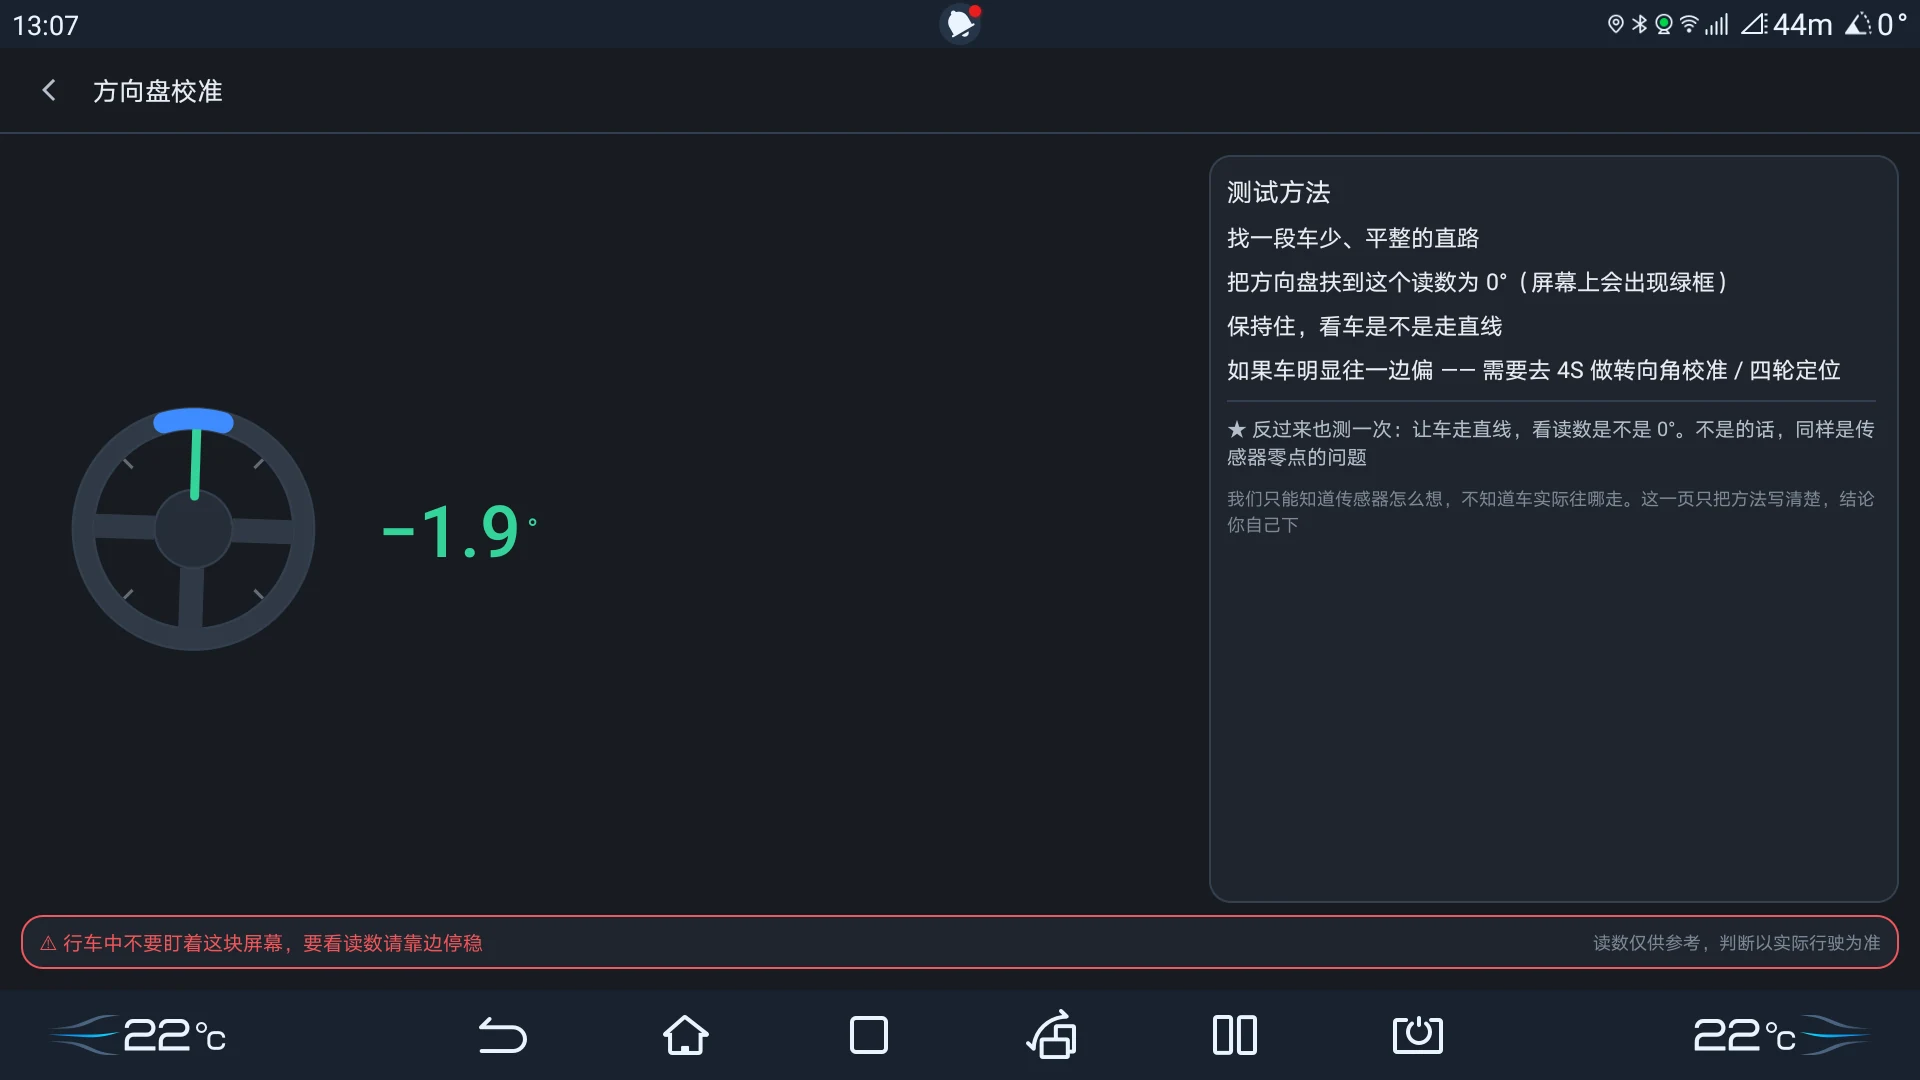
We can only know what the sensor reports, not where the car actually goes. This page explains the method; you draw the conclusion.
7. Frequently asked questions
Nothing appears on the cluster
- 1. Open “Cast to Cluster” once in Amap — this is the cause nine times out of ten (see section 4)
- 2. Confirm the app is set to Cast to cluster, not “Cast to center screen”
- 3. Tap “Cluster preview”:
- · Preview works → the link is fine; the problem is the trigger (signal or gear)
- · Preview does not work → go back to step 1
No recording after switching off
Check in this order:
- 1. Is the Parking Guard master switch on the Parking Guard page on?
- 2. Is “Continuous recording” on? If not, it records only when movement is detected in a zone
- 3. Does the Permissions page show wireless debugging (ADB) as enabled?
- 4. In the head unit’s auto-start list, Zhadi must not be checked — it is a blocklist, and a checked app is prevented from starting
- 5. What colour is the status light? Amber or red means the daemon is not recording; work through the points above
I cannot find the clip I want
Loop recording overwrites the oldest clips — that is how it works, not a failure. If you need to keep something, lock it in the list; locked clips are not overwritten.
Recordings may be on internal storage, a TF card, or a USB drive. Remember to switch the storage filter at the top when you review.
Running out of space
- · Internal storage and the TF card each have their own “max space for drive / max space for guard”; on the same disk the two are independent, but together they cannot exceed the space that disk can give
- · The UI shows an estimate of the maximum hours; use it to adjust
- · A TF quota of 0 means the card is not used; USB drives carry no quota
- · The Video Records page has “Clear today” and “Clear all”
Will Parking Guard drain the battery?
Yes, it draws power — and that must be said plainly. This is a battery-electric car. While parked, the 12V battery only discharges and does not charge. The longer Parking Guard runs and the more it records, the more it draws down.
Suggestions:
- · Short parking (a few hours, overnight) — use it freely
- · Long parking (several days) — turn off “Continuous recording” and keep only zone-triggered recording, or switch the Parking Guard master switch off entirely
Is “Event AI Check” always recognizing things?
No. It is off by default. Even when on, it only reviews five seconds either side of the trigger, on the triggering channel, after a change inside one of your zones starts a recording. No trigger means it does not run. The model runs locally on the head unit; the first enable downloads about 4.7 MB.
AI can miss or misclassify things. It is one more layer of context, not a substitute for security, and must not be described as “24/7 AI monitoring”.
Why is “Recent triggers” gone after I leave the page?
It exists for one purpose: seeing on the spot what triggered an event. It keeps at most the last three 5-second clips in the app cache, and they are deleted when you leave the Parking Guard page. The long-term record is still in “Video Records”: parking clips carry a “Triggered” marker, and you can turn on the “AI detected only” filter.
New car or reinstall
After reinstalling, confirm the three items on the Permissions page again.
8. Safety notes
- · ⚠ Do not operate the screen or watch it while driving. Pull over safely before reviewing recordings or changing settings
- · Recordings may capture other people. Follow local laws on dashcams and do not redistribute private content
- · Parking Guard is not a substitute for security measures; it is one more record
- · Some screenshots are from development builds; the app prevails
About
- · Website: www.batnext.com
- · Version: 1.2.3 (build 23); “Check version” in the app shows the current version and checks for updates
- · Verified environment: BYD Tang EV / DiLink 4.0 / Android 10
- · The PDF is the Chinese print edition (21 pages) and may predate this page; this page is authoritative